2 cups Sugar
1/2 cup brown sugar
1/2 cup soy milk
1 teaspoon almond extract
1 cup Adam's creamy peanut butter
In a saucepan, over medium heat, allow the sugars and soy milk to come to a full boil. Watch out, it sometimes tries to boil over! Stirring constantly, all it to boil for a solid 5-6 minutes. Remove from heat and stir in peanut butter and almond extract.
Pour mixture into a well oiled 9x9 square pan for thicker fudge or 9x13 rectangle pan for thinner fudge. Cover with foil and refrigerate for stability.
Enjoy!
<3thehappyinsomniac
Monday, October 14, 2013
Pumpkin Scones
Tis the season for pumpkin EVERYTHING!!! I love fall, I'm not quite sure what it is...maybe the leaves? The cool snuggly weather? My deep obsession with scarves?
Can't pinpoint it, I just know that fall is MY season. I love it. And eating so...lucky me, introducing the insomniac vegan pumpkin scones! One thing you should note is that I hate Allspice. The smell, the taste, yuck, yuck, yuckkkk. I added it, however too much can flop the recipe right on it's face...so watch out.
Enjoy! <3
Scone Batter:
2 1/2 cup flour
2/3 cup brown sugar
1 Tablespoons baking powder
sprinkling of salt
2 Tablespoons ground Cinnamon
1 teaspoon Nutmeg
Sprinkling of Allspice
3/4 cup chilled butter
1 cup pumpkin....NOT pumpkin pie filling, though it is a tasty mistake
1 ripe banana
3 Tablespoons grape seed oil
Frosting
2 cups powdered sugar
4 Tablespoons Pumpkin Pie Spice
2-3 Tablespoons Vanilla soy milk
Preheat oven to 425 degrees.
In a large bowl or KitchenAid mixer, combine flour, brown sugar, powder, salt and seasonings until well mixed. Take a fork and smash the banana into a pulp and fold pumpkin, banana and grape seed oil into the mix. Add the butter to the mix in chunks. Blend well.
Drop onto a well oiled cookie sheet and shape into triangles and bake for 20-25 minutes.
In a bowl, mix sugar, pumpkins spice and vanilla soy, blend well and set aside.
When the scones are done cooking, remove from the oven and allow to cool. When they are completely cooled, ice and set aside and allow them to dry.
Happy Fall Baking!
<3thehappyinsomniac
Saturday, October 5, 2013
Upcycle project of the...week? ...day?
My newest Craigslist flip project. I love love love it! Paint and primer from Walmart and even after building and staining a counter on top, the whole project was under $100 dollars! Woot!
.jpeg)

.jpeg)
<3thehappyinsomniac
.jpeg)

.jpeg)
<3thehappyinsomniac
Sunday, September 29, 2013
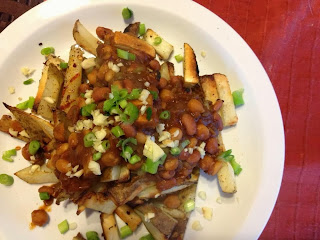
Sunday Football BBQ Chili Fries
Whether I like it our not, our TV is perpetually stuck on NFL every single Sunday starting at the beginning of September every year. With the Seahawks playing, we were feeling a little festive, so naturally, I cooked!
BBQ Chili Fries

Fries:
6 large potatoes
Coconut Oil Spray (Trader Joe's has a good one!)
Johnny's Seasoning Salt
Paprika
Preheat the oven to 425 degrees. Use a fry slicers or a sharp knife chop the potatoes into strips or a Jo Jo style. Lay out on a lightly oiled baking sheet and spray a light coat of coconut oil over the fries. Sprinkle with seasoning salt and paprika. Bake for approximately 20-25 minutes. Remove and set aside.
*For Garlic Fries, add some chopped fresh Garlic and a sprinkling of chopped Parsley.
Chili:
6 Cups of dry beans (mixed types)
OR
6 Cans of beans, drained and rinsed (save some sodium by rinsing!)
2 Cups BBQ sauce
 2 Cups Water
1/2 Cup Ketchup
2 Tablespoons Chili Powder
1 Tablespoon Garlic powder
OR
Freshly chopped Garlic
1 Bunch Green Onions, rinsed & chopped
Soy Cheddar cheese
Fill a large pot 1/2 full with water. Pour in dry beans and allow to soak overnight. When you are ready to begin your chili, turn the pot on medium heat and bring the beans and water to a slow boil. Add the BBQ sauce, water, ketchup, chili powder and garlic powder and allow to continue cooking. When it has began to thicken, turn down the heat to medium-low. Serve over fries. Top with green onions and soy cheddar cheese.
<3thehappyinsomniac
BBQ Chili Fries

Fries:
6 large potatoes
Coconut Oil Spray (Trader Joe's has a good one!)
Johnny's Seasoning Salt
Paprika
Preheat the oven to 425 degrees. Use a fry slicers or a sharp knife chop the potatoes into strips or a Jo Jo style. Lay out on a lightly oiled baking sheet and spray a light coat of coconut oil over the fries. Sprinkle with seasoning salt and paprika. Bake for approximately 20-25 minutes. Remove and set aside.
*For Garlic Fries, add some chopped fresh Garlic and a sprinkling of chopped Parsley.
Chili:
6 Cups of dry beans (mixed types)
OR
6 Cans of beans, drained and rinsed (save some sodium by rinsing!)
2 Cups BBQ sauce

1/2 Cup Ketchup
2 Tablespoons Chili Powder
1 Tablespoon Garlic powder
OR
Freshly chopped Garlic
1 Bunch Green Onions, rinsed & chopped
Soy Cheddar cheese
Fill a large pot 1/2 full with water. Pour in dry beans and allow to soak overnight. When you are ready to begin your chili, turn the pot on medium heat and bring the beans and water to a slow boil. Add the BBQ sauce, water, ketchup, chili powder and garlic powder and allow to continue cooking. When it has began to thicken, turn down the heat to medium-low. Serve over fries. Top with green onions and soy cheddar cheese.
<3thehappyinsomniac
Friday, September 27, 2013
Biscuits & Gravy
Jake and I fixed this yummy autumn classic for dinner last Tuesday. He's a huge fan, while I simply tolerate biscuits & gravy, but it turned out pleasantly delicious! The biscuits are basic, down-home baking powder biscuits with a creamy delectable vegan gravy. Yum yum!
Classic Baking Powder Biscuits
3 Cups Flour
2 teaspoons baking powder
2 teaspoons baking soda
1/2 cup Earth Balance butter (or another vegan butter substitute)
1 cup milk
1 Tablespoon Apple Cider Vinegar
Preheat the over to 450 degrees. In a large bowl (I used my Kitchen Aid Mixer!), mix all of the ingredients except the flour. Slowly add the flour in last, making sure it is all mixed in. Scoop out with a cookie scoop or shape by hand and drop onto a greased cookie sheet. Sprinkle the tops with a bit of flour and put in the oven. Bake for about 10 minutes, check and add a few more minutes if necessary. Take out when they split and dry on top and allow them to cool.
Creamy Vegan Gravy
3 1/3 Cups of Plain Soymilk (The PLAIN part is very important...I've made that mistake with Vanilla, yuck)
4 Tofurkey brand Italian Sausages
1/4 Grapeseed oil
2 fresh Garlic cloves, minced
Sprinkling of Salt
1/2 Cup cornstarch
1/8 Cup cold water
1 Tablespoon Black Pepper
1 teaspoon Thyme
1 teaspoon Oregano
1 teaspoon Mustard Powder
1 teaspoon Sage
1 Tablespoon Paprika
1 Tablespoon Curry
In a saucepan on low-medium heat, add the soy milk, oil, garlic and allow to start to simmer. In a separate bowl, whisk together the cold water and cornstarch and pour into the simmering saucepan. Turn up to medium heat. The gravy should begin to thicken and puff up. If it starts to boil over, turn it down so it doesn't burn. Slice the Italian sausages into bite size pieces and microwave for 2-3 minutes. When they are done add them to the gravy. Stir periodically and begin adding the seasonings. Taste test once in a while and add more flavor depending on your personal taste. When it is thickened and tasty, place on low until serving. Make sure to stir once in a while so it doesn't burn.
Serve over the top of your delicious baking powder biscuits!
Happy Fall!
<3thehappyinsomniac
Wednesday, September 25, 2013
Miso Soup...Insomniac-Style
This particular soup is packed with nutrients, protein and is SO EASY.
2 Cups Vegetable Broth
2 Tablespoons Rice Miso
1 cup water
1/3 of a pack of extra firm tofu, cubed
1 sheet of Nori, shredded
handful of shelled sunflower seeds
Combine all of the ingredients in a saucepan and bring to a boil.
Serve hot!
<3thehappyinsomniac
2 Cups Vegetable Broth
2 Tablespoons Rice Miso
1 cup water
1/3 of a pack of extra firm tofu, cubed
1 sheet of Nori, shredded
handful of shelled sunflower seeds
Combine all of the ingredients in a saucepan and bring to a boil.
Serve hot!
<3thehappyinsomniac
Tuesday, September 24, 2013
Vegan Pumpkin Spice Coffee Beverage
So I am rather depressed that this year I cannot partake in the annual tradition that is the Pumpkin Spice Latte. Especially since part of my job is managing two Starbucks stores. For a drink that screams "Fall is HERE!", I love everything about this drink. The smell, the creaminess, the pumpkiny love.
Sigh.
But alas, the pumpkin sauce contains milk, so it's outcast to the land of non-vegan foods.
The same way that my BF Jake obsesses over pumpkin scones (though I rarely...ok, never...make these), I obsess over pumpkin. For me it's right up there with my obsession for chocolate, rice cream, brownies and anything even remotely near the Chinese food category. It's weird I know, but you'll get over it. For a warm toasty pumpkin beverage in the wholly vegan genre...try this sweet delight.
*Just for the record, you are able to make this recipe COMPLETELY organic if you pay attention to the soy milk and canned pumpkin you buy. Say no to GMO! :)
2 Cups Soy or Almond Milk
1/4 Cup canned Pumpkin Puree (Not Pumpkin pie filling..read the can for goodness sake)
1 Tablespoon pumpkin pie spice
1 teaspoon vanilla extract
Sprinkling of Cinnamon
Sprinkling of Sugar
2 shots of espresso (if you're lucky enough to own one of those fancy dancy machines)
OR
2 Tablespoons of instant coffee (trust me, buy the expensive kind)
OR
1 Starbucks Anniversary blend VIA packet (if you haven't tried these...they're amazing.)
1 cinnamon stick
Standard Kitchen Thermometer
In a sauce pan, slowly heat up your soy or almond milk over medium heat. Stir frequently so it doesn't burn...that would be no bueno. As your milk gets up into the 150 degree range (use your thermometer), you can start stirring in the 1/4 cup of pumpkin puree. As it begins to smooth out and blend, sprinkle your seasonings and add your vanilla, instant coffee or VIA packet. Stir until it has reached a comfortable 170 degrees and serve with a cinnamon stick while still hot!
*Feel free to add more or less pumpkin to your recipe depending on your tastes. YUM YUM!
Enjoy! Happy Fall :)
<3thehappyinsomniac
Monday, September 23, 2013
Lazy Day Sweet & Spicy Soup
1 large can pineapple, chunked
2 bar mixer sized cans of pineapple juice
1 cup water
1 clove garlic, minced
1/2 block extra firm tofu, chunked
2 single stalk of celery, rinsed & chopped
4 Tablespoons hot sauce
Sprinkling of Trader Joe's sweetened Nori crumbles (in the snack sections!)
In a large saucepan mix, pineapple, pineapple juice, garlic, water, tofu, celery and set to medium-high heat until it comes to light boil. Add hot sauce and crumbles. When celery is tender and cooked through, serve hot.
Enjoy!
<3thehappyinsomniac
Asian Plum Sauce; Guest Blogger: Laurie Neal
It is hard to resist a rich Asian Plum sauce-it is easy to resist a plum sauce with a whole truckload of ingredients one can't pronounce. Summer is here and fresh fruit is plentiful. It is a wonderful time to make one's own plum sauce to enjoy on those soon to arrive winter nights. Now, I, unlike the Happy Insomniac, am not vegan but she can jump in and add ideas for vegan dishes using the Plum sauce below.
About two years ago, I discovered a wonderful book, "Ball Complete Book of Home Preserving, 400 delicious and creative recipes for today". Edited by Judi Kingry and Lauren Devine. Copyright 2006.
In this book is a plethora of recipes for using fruit in ways other than the traditional canned fruit and jam. I have such delicacies as "Bruschetta in a Jar" and "Orange Rhubarb Chutney" on my shelf using this great resource.
It is important to remember when canning, follow the directions closely and only make batches in the size called out. Don't double or triple recipes, don't change the amounts of ingredients unless the recipe says you can change or substitute. These recipes are calculated to produce a product in a canned jar that is food safe i.e. will not make anyone very sick from consuming it. Make single recipes in multiple pots!
Freezing does not carry all the same safety issues as canning but not everything freezes well. Luckily for us, Plum Sauce does! So every August I gather my fragrant purple plums from the tree and cook it into the following sauce:
Plum Sauce
makes about 4 pints
- 2 cups of lightly packed brown sugar
- 1 cup granulated sugar
- 1 cup cider vinegar
- 3/4 cup finely chopped onion
- 2 tablespoons finely chopped seeded green chili pepper, such as Anaheim, New Mexico green chili, poblano or jalapeno.
- 2 tablespoons mustard seeds
- 1 tablespoon salt
- 2 cloves garlic, finely chopped
- 1 tablespoon finely chopped gingerroot
- 10 cups finely chopped pitted plums (finely chopped, careful not to puree)
1. In a large stainless steel saucepan combine the brown sugar, granulated sugar, vinegar, onion, chili pepper, mustards seeds, salt, garlic and ginerroot. Bring to a boil over high heat, stirring constantly. Add plums and return to a boil. Reduce heat and boil gently, stirring occasionally, until thick and syrupy, about 1-3/4 hours.
2. Meanwhile, prepare canner, jars and lids.
3. Ladle hot sauce into hot jars, leaving 1/2 inch (1 cm) head-space. Remove air bubbles and adjust head-space, if necessary, by adding hot sauce. Wipe rim and Center lid on jar. Screw band down until resistance is met, then increase to fingertip-tight.
4. Place jars in canner, ensuring they are completely covered with water. Bring to a boil and process for 20 minutes. Turn off heat, remove canner lid. Wait 5 minutes, then remove jars, cool and store.
If any of this info on canning sounds like a foreign language - find this book, it is also a great textbook for learning canning. Also, Google the USDA Home Canning guide online - another great resource, I have had my paper version for 20 years. I check the online version every year for updates.
For freezing - pour sauce no deeper than 2 inches into a container. Place in the refrigerator uncovered and allow it to cool. When cool, place in freezer containers in a batch size you will use, like 1 cup or 2 cups. Put the lid on and place in the freezer. Try to use within 3 or 4 months for best flavor.
Now I use my plum sauce to cook ribs or pork roast but for the vegans and vegetarians in the crowd -? *Coming Soon! <3thehappyinsomniac*
Cheese Maker's Daughter Update: Yup, I'm still Vegan...But I love my Mother.

Laurel's Crown has officially become a "Thing", with a captial "T", now that it has a Facebook, a soon to be finished website and a semi-trailer that it will soon call home in the middle of a Othello Dairy field after it's impending remodel. Yay!
More pictures coming soon from the photo shoot, it was fun! Taken mostly on an antique produce scale and featuring the cheeses soon to be dawning to Laurel's Crown official label including "Othello", this is very exciting!
To follow Laurel's Crown & my mother's "cheesy" adventures, visit their official Facebook page HERE!
Cheese list coming soon...and maybe even a wine pairing list or two!
<3thehappyinsomniac
Sunday, September 22, 2013
Sweet Sunday
 I have always had a sweet tooth. It's got me in trouble, especially when managing my neverending battle of maintaining a healthy weight. Since adopting veganism however, having to closly monitor what I'm eating and using as fuel has seriously put a damper on the random sugar buzzes when I hit the grocery store. My favorite things ever are bakery items and it has become somewhat more difficult to find.
 Being an advocate for local small businesses, I always look for delicious vegan options that are locally run by Spokanites just trying to make they're living by doing what they love. Is there seriously anything better than someone loving their job when so many others don't? Nope. Don't think so.
Petit Chat
(509) 468-2720
If you are in the Whitworth part of town, make sure you go by Petit Chat. Great homemade pastries, breads and espresso fresh made everyday. Also, if you get there soon enough, day-olds are half off! My freezer gets stocked up every time I go, so I can have delicious, homemade bread everyday of the week.
Dawn of the Doughnut
3402 N Division St
Spokane, WA 99207 Located in the newly renovated Papa Murphy's building on lower Division, this unique zombie themed shop focuses on tasty doughnuts of all favors, vanilla, chocolate, weird and wacky. With a variety of crazy doughnut recipes and equally fun names, any zombie lover or horror movie fanatic will love this place. My step-son, Chris, who is 7 gets extra excited that the entire staff is dressed up as zombies as part of their regular work uniform. And, the owner looks like Sally right out of the Nightmare Before Christmas, which is pretty freakin' cool. Visit the drive-thru or head inside where EVERYTHING is dripping with "blood" complete with bloody hand prints all over the ceiling. It's so original for Spokane and delicious. Really delicious.
Support Local Vegan-Friendly Businesses!
Happy Sunday! <3thehappyinsomniac
Friday, September 20, 2013
Apple Cider Water
Since the thought of drinking actual apple cider practically puts me in a sugar coma, I found this recipe online that actually sounded ok.
1 mug of steaming hot water
2 slices of apple
1 cinnamon stick
1 teaspoon agave syrup or rice syrup
*Maybe add an apple tea bag too? For an extra flavor kick?
Combine and let seep for 5 minutes.
Yum. Fall.
<3 data-blogger-escaped-br="" data-blogger-escaped-happy="" data-blogger-escaped-insomniac="" data-blogger-escaped-the="">
Thursday, September 19, 2013
The Perfect Fall Appetizer

Baked squash is the perfect, easy prep appetizer. Tasty!
Squash, sliced
Coconut oil spray
Seasoning salt
Sliced, spray and sprinkle...then bake for 15 minutes on 350 degrees.
Serve! <3 data-blogger-escaped-br="">
<3 data-blogger-escaped-br="" data-blogger-escaped-happy="" data-blogger-escaped-insomniac="" data-blogger-escaped-the="">
Tuesday, September 3, 2013
Fall Tofu Soup
4 large carrots, chopped
4 large stalks celery, chopped
1 block extra firm tofu, cubed
1 cup barley or rice
4 tablespoons veggie soup base concentrate (jar form!)
10 cups water
Salt to taste
Boil water, throw everything in an allow to cook for 30 minutes.
Serve!
<3 The Happy Insomniac
4 large stalks celery, chopped
1 block extra firm tofu, cubed
1 cup barley or rice
4 tablespoons veggie soup base concentrate (jar form!)
10 cups water
Salt to taste
Boil water, throw everything in an allow to cook for 30 minutes.
Serve!
<3 The Happy Insomniac
Saturday, August 3, 2013
Vegan 5-layer taco dip!

Yum yum!
Layer in a casserole dish:
Non-fat refried beans (warm them first!)
Diced tomatoes
Chopped black olives
Chopped lettuce
Vegan sour cream
Sprinkle with vegan cheddar!
Serve with chips :)
With love,
<3thehappyinsomniac
Sunday, July 28, 2013
Sweet n' HOT
Sauce:
1 can chunked pineapple
1/2 can cold water with 2 Tablespoons cornstarch mixed in
1 Tablespoon chili powder
1 Tablespoon chili paste.
Mix pineapple, chili powder & paste in a saucepan, bring to a boil. Add the cornstarch mixture to thicken.
Serve with rice noodles or grilled tofu, or both!
<3thehappyinsomniac
<3 The Happy Insomniac
Thursday, July 11, 2013
Oatmeal Energy Bites
1 tablespoon of Adams Peanut Butter
Instant or rolled oats
Carob Chips
Cinnamon powder
*optional dark chocolate Cocoa Powder
In a bowl, add oats to 1 tablespoon of peanut butter until it reaches a cookie dough type consistency. Fold in chocolate chips and sprinkle with cinnamon powder.
Roll in dark chocolate powder if you wish, creates a "truffle" type look.
Makes approximately 3-4 energy balls at about 40 calories each.
Other good additions are raisins & chopped almonds.
Happy cooking!
<3 The Happy Insomniac
Tuesday, June 18, 2013
Manicotti deliciousness...

So Sunday was Father 's day. As many of you have probably guessed, I have started dieting hardcore which means my recipes for vegan delight must wait until my boring rabbit food diet is through.
But, even the best dieters know, you can't be good 100% of the time so I whipped up a Italian favorite in celebration of Jake being a wonderful daddy and boyfriend. Good job baby :)
Vegan Manicotti
Dry, uncooked Manicotti shells (check the label!)
Red pasta or spaghetti sauce
Shredded mozzarella
Filling:
2 cubes extra firm tofu
4 tablespoons chopped garlic
2 teaspoons salt
2 tablespoons of Italian Seasoning
1/4 cup shredded vegan mozzarella
In a bowl, use an electric mixer to whip together all of te filling ingredients. They should become creamy. Load into a gallon size ziplock bag and cut off a corner to create your own little makeshift pastry bag.
Fill each manicotti shell (half on one side, half on the other), and lay them 1 layer deep in a casserole dish. When all the shells are filled, cover with a layer of spaghetti sauce and sprinkle with "cheese".
Bake at 350 degrees for 40-50 minutes.
Serve!!!
With Love,
<3thehappyinsomniac
Saturday, June 8, 2013
Summer Reading List

The last BOOK BOOK I read was over Memorial Day weekend, and I didn't even finished it. One of those fluff books, you know? Romantic, enduring lead character, but a mysterious shawl that kills people? That kind of crap.
It's been ages since I actually picked up a book book that hasn't involved how to cook vegan, so it's become my summer quest.
First book:
Miss Peregrine's Home for Peculiar Children
By Ransom Riggs
I'm half way through, and can't put it down! And BONUS, it has pictures! Ill review it when I'm finished, but it's looking very, very promising!!! :)
What are you reading this summer?
With Love,
<3 The Happy Insomniac
Tuesday, June 4, 2013
Super Fast Dijon Dressing
2 tablespoons REAL Dijon mustard
2 teaspoons water
Sprinkle of pepper
Combine and mix well with a fork. Totally kills a craving for spice! Yes!
With Love,
<3thehappyinsomniac
<3 The Happy Insomniac
2 teaspoons water
Sprinkle of pepper
Combine and mix well with a fork. Totally kills a craving for spice! Yes!
With Love,
<3thehappyinsomniac
<3 The Happy Insomniac
Wednesday, May 29, 2013
Just in the Nick of time Cabbage Salsa; Guest Blogger: Laurie Neal
Guest Blogger for Today; Wednesday, May 29th:
Laurie Neal (Mi mama!) and her "Just in the Nick of time cabbage salsa!"
Enjoy!
"This is a truly personal taste cabbage salsa using relatively quick ingredients. Remember when you add an acid (like lime juice or vinegar) and/or salt, it causes the cabbage to lose liquid, wilting it. So you want to be cautious about adding too much of either.
This past weekend, for the family South of the Border Eat- A -Thon, I made:
Just in the nick of time cabbage salsa
2 bags angel hair cabbage shreds
chopped red onion (about a 1/4 cup, more if you wish)
pickled jalapeno from can or jar (we are wimps so I chopped up 3 slices)
1 bunch cilantro (take off the stems and wash REALLY well, cilantro always seems to have a lot of dirt in it)
small tomato chunks (optional, however many you want, nice color)
lime juice
kosher flake salt
Now, throw everything into a bowl except the lime juice and the salt. Then I squeezed 6 small limes, added a little of the jalapeno juice from the jar and put in, oh, maybe 1 to 1-1/2 teaspoons of salt in on top of the other ingredients and tossed. If you want to use it fairly quick, leave it at room temp for a short period of time, say 15 minutes, then taste. If you have time, put it in the fridge for a longer time. Taste and adjust to personal preference. You are always better off to start light with peppers, salt & lime and adding more or you end up throwing it out and starting over because it is too strong.
Oh and maybe when you do it, you want to write down your ingredients so you can do it again. This is great for tacos (particularly fish) or with chips or nachos."
<3 The Happy Insomniac
Tuesday, May 21, 2013
Peanut Butter Cravings
I love peanut butter. On the tasty rating scale from 1-10...peanut butter is probably a 9, topped only by chocolate AND peanut butter mixed. Which were covered in one of my previous blogs: Peanut Butter Cups (vegan).
In a everlasting pursuit to find things both healthy and easy, I stumbled across Foodie Fiasco & her recipe for World's Healthiest Peanut Butter Cookies. I made them this afternoon, and they turned out pretty good considering I didn't have Coconut flour on hand. I can see where they would be better with it.
Another one I am dying to try is Modern Mom's vegan Peanut Butter Cookies. Flax seed meal and a host of other delicious sounding ingredients.
Peanut Butter Granola is also on my list of recipes to try from Alicia Silverstone's vegan site: The Kind Life, based of her cookbook. One of my FAVORITE cookbooks, and a very motivational girl.
What's your favorite peanut butter recipes?
Happy Tuesday!!!
With Love,
<3thehappyinsomniac
Friday, May 17, 2013
The Thing about 25... (craft)


The Thing about 25
(Beginner Level&CUTE!)
The thing about 25 is that something happened I didn't expect. (Beginner Level&CUTE!)
Everyone started having kids! And not just 1...but 2...and 3!
Whenever someone else makes another announcement, for some reason I get crafty. There's something about babies, you just want to make something cute.
I made one of these flag banners for my bestie Kelsey's, maternity photo shoot we did for fun with little Liam's name on it. Now, I have a couple other friends with babies on the way, so I have began again!
And the best part, they are so easy you can make them too :) Not just for babies, but birthdays, kid's rooms, parties, etc. Just pick your colors and go! :)
Supply List:
- Similar design/shade Scrap booking paper
- Hot glue gun/ replacement glue sticks
- Crafting ribbon
- Crafting scissors
- Tape measure
- Flag Stencil-or make your own out of a piece of cardboard
- Go prepared. What colors do you need? What shade? Patterns? I am notorious for finding the colors I want, going to Home Depot or Walmart and picking out the paint chip and carrying it around with me every time I go shopping for remodel supplies. I've also had a few friends do this while planning their weddings. It helps so I don't get home with the wrong color and have to make multiple trips. Also, make sure you measure wherever you plan on putting your flags. Factor in about 5-6 inches for tying room so you don't cut yourself short.
- Pick your paper. *Helpful Hint: Michael's Craft Store often runs sales on scrap booking paper 5 for $1. It definitely will help your budget, and their variety is quite extensive.
- Pick out your ribbon. I usually pick a color that matches my color scheme and is a little subtle so it doesn't try to steal the show. Any thickness will do, though anything less than 1/2" thick is a little more time consuming to glue.
- Stencil. I always make my own stencils. Triangles are most popular, but others I've seen: half circles, squares, rectangles, etc. Cut it out of a piece of cardboard and trace it onto the back of your scrap booking paper. Cut them each out. Keep the patterns of paper separated.
- Put it together. Glue a thin bead of hot glue at the top of your flag and press the ribbon into it. Space them out however far apart you like. Make sure the ribbon doesn't get twisted. I usually alternate a solid color with a patterned flag.
Good Luck&Happy Crafting!
With Love,
<3thehappyinsomniac
Tofu Scramblicious

Easy Tofu Scramble
(Yummy&Easy)
Prep Time: 10 MinutesCook time: 10 Minutes
Cooking Stuffs:
1 package extra firm tofu, pressed and cubed
2 stalks celery, rinsed&chopped
1 carrot, rinsed&shredded
1/2 cup Cashews, chopped
1/2 cup chickpeas, rinsed
2 cups of green Kale, rinsed&chopped
Drizzle of Grapeseed oil
1 Tablespoon Soy sauce
Chili powder for seasoning
Fine sea salt for seasoning
Throw everything in a well heated pan and saute until tofu is browned and veggies are thoroughly cooked.
Rule of Thumb: Veggies, drizzle, season. (Great Cooking Mantra!)
Use your creative genius with the spices, I rarely use the same ones twice!
With Love,
<3thehappyinsomniac
Wednesday, May 15, 2013
Peanut Butter Cups (Vegan)

1 1/2 cups carob chips
1 cup peanut butter
1/2 cup powdered sugar
2 tablespoons vanilla
Mini cupcake paper cups
Make Time: 15-20 minutes
In a saucepan on the stove, use low heat to melt down the carob chips.
In a medium size bowl, mix the peanut butter, powdered sugar, and vanilla and blend well.
Lay out mini cupcake papers and layer a dollop of chocolate, a dollop of peanut filling, and then a drizzle of chocolate on top. Place in the freezer until cool. Enjoy!
With Love,
<3 The Happy Insomniac
Monday, May 13, 2013
The Great Dresser Project
It is my lot in life to be surrounded in pretty things, tidy, and organized in such a way it is seemingly effortless. Of course, I do live with boys and a very bouncy puppy. So, good luck.
I have however been remodeling our house over the course of a year, and it is amazing how far we've come.
My project over the weekend was converting a dresser we've housed in the basement since the 7-year old's wardrobe out grew its little drawers. Perhaps a nice office organizer in my future?


1 pint can of vintage teal paint from Home Depot, left over "Dakota Ranchwood" from our living room remodel, 2 knobs from World Market, and a piece of sandpaper for that "weathered" look, and you've got yourself a whole new dresser! :D
With Love,
<3 The Happy Insomniac
Monday, May 6, 2013
"...On-the-Side is a very big thing for you"

Taco Night Success
(delish & vegan)
Something usual happened last weekend, my 2 siblings and I were all in same place at the same time. Which on average happens...maybe Christmas & Memorial Day weekend. Maybe Mother's Day too. My brother lives near me, but is soon leaving for the "beef-jerky state" (Montana) to finish his degree and my sister is a RN, 5 hours away. So it's a good time when we all end up together and can actually stand each other long enough to eat a few meals (lol).
Tacos were on the menu, ('Tacos Evolved' Recipe). It's an item of popularity and they are easy to make vegan or non-vegan depending on the crowd. Overall, a yummy meal, that was followed by German Chocolate Cake...in which only crumbs remained after my brother and Jake got to it.
My favorites are always things "on-the-side". The guacamole, salsa, toppings...yum yum.
- Black Bean Avocado Dip
- Plain Jane Fruit Salad
- David's Cabbage Salsa Recipe
- Blackened Tofu (Jake and I's taco topper)
Our Beer Pairing was: Alaskan Amber
With Love,
<3thehappyinsomniac
Thursday, May 2, 2013
Asian Kale Salad (vegan)

Asian Kale Salad
(vegan&easy!)
Prep Time: 20 Minutes
Refrigerate Time: 1-2 Hours, Refrigerate while not in use
Cooking Stuffs:
8 cups fresh green kale
1 cup cashews, chopped
2 large carrots, rinsed&shredded
1/2 cup shelled sunflower seeds
1 cup raisins
2 cups Orange-Ginger Teriyaki Sauce
While the sauce is cooling (put it in the fridge to speed it up!), use a large bowl to toss the kale, cashews, shredded carrots, sunflower seeds & raisins.
Pour the sauce over the salad 1/4 cup at a time, toss well between each scoop. When the entire salad is covered in a light layer, cover with foil and refrigerate for 1-2 hours or until chilled.
Serve!
If you have leftover sauce go here!
This is also similar to the Chilled Rice Salad...but more tasty and more of a side dish or a late afternoon snacky! :)
This is also similar to the Chilled Rice Salad...but more tasty and more of a side dish or a late afternoon snacky! :)
With Love,
<3thehappyinsomniac
Tuesday, April 30, 2013
German Chocolate Cake & Coconut Butter Cream Frosting (vegan)

German Chocolate Cake & Coconut Butter Cream Frosting
(Vegan&Delicious!)
This recipe is adapted (VERY loosely based) from my well-loved 75th Anniversary Edition of the Better Homes and Gardens Cookbook. This is Jake's favorite and I'll take by the emptiness of my plate sitting in the kitchen...fan favorite :)
Happy Baking!

Prep Time: 20-30 Minutes
Cook Time: 25 Minutes
Put together Time: 20 Minutes
Cooking Stuffs:
Cake:
3 Flax seed eggs (Recipe!)
1/3 cup melted Earth Balance vegan margarine
 1/3 cup mild flavored oil
 1 1/4 cup baking flour
3/4 tsp baking soda
Sprinkling of salt
4 Tablespoons baking cocoa
1 Cup raw sugar
1 teaspoon vanilla extract
3/4 "sour" milk (mostly coconut milk with a splash of vinegar will do)
Frosting:
1/2 cup Earth Balance vegan margarine, (preferably at room temp)
1- 1 1/2 cup shredded coconut
1 cup powdered sugar
2 Tablespoons vanilla extract
1/2 cup coconut for patting
Cinnamon for sprinkling
Cake:
Preheat the oven to 350 degrees. In a sauce pan, melt the margarine and whisk in the cocoa powder. In a medium sized bowl, mix all the cake ingredients, and fold in the margarine/cocoa mixture. Should create a slightly thick, yet pour able batter. If it's a bit too thick, add some additional water to make up for some of the missing moisture from using flax eggs instead of regular. Pour into (2) 9" round pans or (1) 9"x13" rectangle pan. Bake for 20-25 minutes and remove to cool.
Frosting:
In a smaller bowl, using an electric mixer, blend the margarine, coconut, powdered sugar, and vanilla. Should mix into a nice, creamy frosting. Add more powdered sugar for a stiffer texture.
Putting it together:
When your cake has cooled, remove the cake from the pan. For a square cake, cut the rectangle sheet in half so there are 2 squares to stack. Frost the top of the first square and stack the second square on top to create your layers. Frost the entire cake and pat some extract coconut across the top. Sprinkle with cinnamon. For a circle cake, do the same.
With Love,
<3thehappyinsomniac
Tuesday, April 16, 2013
Orange-Ginger Teriyaki Sauce
Orange-Ginger Teriyaki Sauce
1/4 Cup Soy Sauce
1 Cup Water
1 1/2 Teaspoons ground Ginger
1 Orange, juiced
1 Tablespoon Orange zest
5 Tablespoons Raw Sugar
1-2 teaspoons agave syrup
2 Tablespoons of corn starch
1/4 Cup cold water
* For Orange Zest, use the littlest teeth on the grater.
In a saucepan over medium heat, start adding the Soy sauce, water, ginger, orange juice, zest, sugar and agave. Bring to a light boil. In a small cup or bowl, whisk the cornstarch and cold water thoroughly. Add to the sauce pan, and allow the sauce to cook for 6-8 minutes to gain it's thickness.
Serve warm over rice or noodles.
With Love,
<3thehappyinsomniac
Sunday, April 14, 2013
Pesto Quinoa Salad (vegan)

Dinner tonight was my favorite pasta sauce ever, basil pesto, mixed with hearty protein-packed superfood, quinoa! Jake made up some whole-wheat noodles to mix with his, but I ate it straight. Yum!
 Pesto Quinoa Salad
Prep Time: 15 Minutes
Fridge Time: 1 hour
Cooking stuffs:
Salad:
4 cups quinoa (cooked)
1/4 cup whole or pieced cashews
1/4 cup shelled sunflower seeds
 Handful of Green olives
1 large Carrot, rinsed&shredded
Sprinkling of sea salt
Pesto:
2 Cups Basil
1/2 cup Cashews
1/2-3/4 Cups Grapeseed oil
1 Tablespoons chopped garlic
In a Cuisinart, mix all of the pesto ingredients and blend well. It should be creamy, and if not, add a bit more Grapeseed oil until smooth.
Cook the quinoa in a rice cooker or on the stove until tender. In a glass bowl, toss the remaining salad ingredients with the cooked quinoa. Using a spatula, scrape all the pesto in the salad mix, and fold in thoroughly. Cover and refrigerate until cold, approximately 1 hour.
Serve as is or tossed with 4-6 cups of whole wheat noodles.
With Love,
<3thehappyinsomniac
Quickie Veggie Soup (vegan)
Spent the morning with my lovely Hamilton Family <3 and came home to the predicament...what to make for lunch? With a starving boyfriend hovering around the kitchen rifling through cupboards, he announced his choice.
Soup.
Just what I wanted! So we did a fridge raid and started choppin'. Jake ended up taking over, and doing his chef thing, while I prepped dinner.
So cute :)
Quickie Veggie Soup
Prep Time: 15 Minutes
Cook Time: 15-30 Minutes
Cooking Stuffs:
8-10 Cups Veggie Soup Base (the choices on this one are endless.)
4 Carrots, rinsed&chopped
3 Cups Kale, rinsed&chopped
1 Cup Spinach, rinsed&chopped
4 stalks Celery, rinsed&chopped
4 Tablespoons Soy Sauce
1 Tablespoon chopped garlic
1 Teaspoon pepper
2 Cups rice or barley, dry
1 Cup Quinoa, dry
In a large pot, start your veggie soup base on low heat. Rinse and chop all your vegetables, and add them to your pot, stirring every so often. Mix in the soy sauce, pepper and garlic, and bring soup to a boil. When it has reached boiling, add the rice & quinoa allowing to cook for 8-10 minutes. Stir regularly while the rice/quinoa is cooking. When fully cooked, turn the soup to simmer, and serve!
The Manda Version:
Dish your soup, serve with tortilla chips.
The Jake Version:
Dish your soup. Add 1 slice of soy mozzarella cheese & 10-15 crushed saltine crackers to it and mix in well. Top of with 2 teaspoons of chili powder, stir in.
*Spicy, but has a very creamy taste. Was quite tasty!
With Love,
<3thehappyinsomniac
Saturday, April 13, 2013
Chocolate Chip Cookie Dough Hummus (vegan)
I love cookies. I mean, who doesn't?! So when something semi-healthy and vegan comes along that's as easy as this recipe, I have to jump on board. I've seen a variety of ways this recipe has been made floating around on Pinterest (found by my baking buddy Whitney!) and so far over the last few weeks (with few tweaks) have made it my own delicious guilty pleasure.
And I only feel slightly guilty :)
Chocolate Chip Cookie Dough Hummus
Prep Time: 10 Minutes
Fridge Time: 30 Minutes-1 hour until chilled, refrigerate when not in use
Cooking Stuffs:
1 Cup Chick Peas
1/3 Cup Natural Peanut Butter (Adams or whatever)
1/4 Cup (minimum) Agave Syrup or Rice Syrup
2 teaspoons Raw sugar
3 Tablespoons Vanilla extract
1 teaspoon Almond extract
1/2 Cup Carob Chips (vegan chocolate chips)
In your small cuisinart or a blender, blend the chickpeas until smooth. Add the peanut butter, agave, sugar, almond extract, and vanilla and blend again until all the ingredients are mixed. Stir in Carob chips, cover, & refrigerate. Serve with veggies or teddy grahams (vegan!).
Tip: Taste your hummus to make sure it's sweet enough to your liking. If not, feel free to add a bit more agave!
Happy Snacking!
<3thehappyinsomniac
Friday, April 12, 2013
Better-Than-Sex Sundae (vegan)

Not healthy. So if that's what you're looking for, turn back now.
But for a tasty treat, try this!
3 scoops vanilla rice milk "ice cream"
1 teaspoon Agave syrup
Sprinkling of Carob chips
Sprinkling of Cashews bits
1 Tablespoon peanut butter
1 Tablespoon coconut milk
In a bowl, add peanut butter & coconut milk. Microwave for 1 minute, then whisk together until smooth. This should create a creamy peanut butter drizzle. Scoop your "ice cream" on top and add your selection of toppings. Drizzle with agave to finish.
Enjoy!
<3thehappyinsomniac
Monday, April 8, 2013
Dessert for Breakfast
I prepped up this tasty little treat for my breakfast in the morning, since I'm a bit sick of oatmeal. Feel free to mix it up! Optional items are: nuts/seeds, dried fruit, or a variety of other seasonings (i.e. nutmeg, cocoa powder, etc) <3
Dessert A'la Rice
Prep Time: 5 Minutes
Cook Time: 5 Minutes
Cookings Stuffs:
1 Cup Rice
3 Tablespoons Organic Agave Syrup
2 Tablespoons Cinnamon Powder
Splash of Coconut Milk
1/4 Cup Fresh Blueberries
In a rice cooker or pan, cook your rice until tender. Before it is allowed to cool, stir in the agave, cinnamon & coconut milk. Fold in the blueberries and serve warm, or refrigerate until ready to serve. Enjoy!
Happy Breakfast-ing!
<3thehappyinsomniac
Pub Burgers & House Fries (vegan)

Ah, burgers. A Summer staple food. Picnics, BBQ's, 4th of July, there is nothing more traditional that a big juicy burger. Except when your vegan of course! :) This morning, Jake, Chris and I made our regular Sunday venture to our favorite bakery, Petit Chat, for bread and treats and came across some in-house, vegan friendly hamburger buns. So light & fluffy, and of course, delicious. We were won over, and our dinner plans became set in stone, Pub burgers! I went the easy route this time, and didn't make my own hamburger patties as I would have preferred. Boca or Morning Star stuff is a good substitute, just make sure you check the ingredients! Not everything is VEGAN.
On the fry side, I have ALWAYS been an advocate for baking home fries instead of frying them simply because it's healthier, and was raised on baked potato fries. Jake, however, is an Indianian, and down South in Indiana, they fry. So for the first time in our 2 years of dating, I broke down and agreed to let him to actually fry our fries! He had a blast :) We used Grapeseed oil instead of soybean or veggie (bleh), but they turned out pretty durn good. Maybe in another 2 years, I may let him try them again :)
Disclaimer:
Not trying to scare you out of trying them, however: Caution on the fries, these are NOT LOW FAT! They are everything bad you'd expect them to be. They are vegan, but only in technicality alone. Unfortunately though, they are yummy, yummy, yummy!
P.S. Enjoy!

Pub Burgers & Home Fries
Prep Time: 30 Minutes
Cook Time: 30 Minutes-1 Hour
Cooking Stuffs:
Burgers:
Petit Chat's Tuscan Kaiser Hamburger Rolls or any other vegan hamburger bun (make your own!)
1 Box of Boca or Morning Star Vegan Hamburgers or Make your own (See here for one recipe)!!!

Vegannaise
Ketchup
Cabbage or lettuce
1 Large Red Pepper
1 Scallion, minced
2-3 cloves of fresh garlic, minced
Fries:

2 Cups (sliced) your choice of regular potatoes, sweet potatoes, or eggplant
Onion Powder
Chicken Seasoning (VEGAN) (Basically just a mixture of: Paprika, Onion, Curry, Garlic, Black Pepper)
Black Pepper
Sea Salt
3 Tablespoons Flour
2 Cups Grapeseed or Sesame Oil
Coconut Oil Spray (optional)
1 batch of homemade Vegan Fry Sauce
Allow the burgers to defrost if frozen. Chop the red peppers into 1/4" slices, and allow to brown on medium heat in a non-stick skillet. While they are starting to brown add the scallion & garlic. When they are done (about 10-15 minutes, keep a close eye), remove from heat and set aside. Move on to the fries. While the fries are cooking, place your burgers in a skillet to brown (approximately 3 minutes on each side on Medium heat).
Fries:
1. Read Safety First below. Place the oil in a sauce pan over medium heat. MAKE SURE you have on long sleeves. Ensure the pan is covered or it will pop all over the walls and you. While it is preheating, slice your potatoes or egg plant into slices no bigger than 1/4" thick. In a gallon sized Ziploc bag, mix your seasonings, Sea salt, and flour. Close and shake thoroughly Either rinse your potatoes/eggplant in a strainer or spray them with a light coat of coconut oil, then dump into the bag of your mixed seasonings. Seal, and shake well thoroughly covering them in an outer coat. When you're ready, pull them out and drop them into your oil with a METAL strainer spoon. Allow them to cook for 15-30 seconds and remove immediately. Place them on a cookie sheet to cool.
*Disclaimer: Safety First. Deep frying is EXTREMELY dangerous if done incorrectly. It can be an extreme fire hazard as people continually prove every Thanksgiving. Do your homework, and be confident that you know what you're doing. /Always wear long sleeves or long oven mitts if you have them. Always keep a lid and a giant box of baking soda nearby, and NEVER USE WATER to put out a grease fire. Good Luck, Be Safe!
Deep Frying on an Electric Stove.
Kitchen Safety: Putting Out Grease Fires
When your burgers and fries are done, build your burger! We are boring and usually only use vegannaise, ketchup, and lettuce, but feel free to take creative intiative.
Happy Cooking!
<3thehappyinsomniac
The Nourishing Gourmet
Um, this looks amazing.
Curried Sprouted Lentils w/Ginger & Garlic Cilantro Sauce
<3thehappyinsomniac
Curried Sprouted Lentils w/Ginger & Garlic Cilantro Sauce
<3thehappyinsomniac
Damn you Martha.
I realized this morning that after years of ambitiously following her, (prison years discluded lol),
I will never be Martha Stewart.
I can decorate a house, cook & bake up a storm, and create stellar floral arrangements...
But I will NEVER be able to keep anything beige clean.
Damn you Martha.
<3thehappyinsomniac
I will never be Martha Stewart.
I can decorate a house, cook & bake up a storm, and create stellar floral arrangements...
But I will NEVER be able to keep anything beige clean.
Damn you Martha.
<3thehappyinsomniac
Monday, April 1, 2013

Sunday, March 31, 2013
Sunrise Cinnamon Rolls (Vegan)

Happy Easter! We started our day with homemade cinnamon rolls, a Neal family tradition that has been carried over to the Phillips tribe (and welcomed with open arms I might add!).
These Sunrise Cinnamon Rolls have a traditional cinnamon roll base, with a dash of citrus love! No matter the Easter traditions, these are a delicious addition to any Springtime breakfast table.
Enjoy!
 Sunrise Cinnamon Rolls
Prep Time: Approximately 1 hour
Rise Time: 2 hours (split)-Overnight
Bake Time: 20 Minutes
Cooking Stuffs:
Dough:
1 1/4 cups Vanilla Almond Milk
1/2 cup raw sugar/brown sugar mix
1/4 teaspoon sea salt
 8 Tablespoons Earth Balance Vegan Margarine
1 teaspoon Vanilla or Almond extract
1/4 cup tepid water (no hotter than 120 degrees otherwise the yeast will die)
1 envelope of active dry yeast
4-4 1/2 cups all-purpose baking flour
Filling:
1/2 cup raw sugar
1/2 cup brown sugar
4 Tablespoons cinnamon
 1/2 cup Earth Balance Vegan Margarine (don't freak out, I didn't use it all lol)
Dash of Nutmeg (an aquired taste, you can skip this part)
Frosting:
1 batch of Vegan Cream Cheese Frosting
3 Tablespoons of Orange Zest
Other:
Olive Oil or Coconut Oil Spray
*I used my Kitchen Aid Mixer + dough hook to kneed the dough, but feel free to use a mixing bowl, and a counter top! I've done it both ways, but today I was feeling lazy :/
In your mixer's bowl, or in another small bowl, start your yeast mixture: 1 packet + 1/4 cup tepid water. If the yeast is live, it will start to slightly bubble after about 10 minutes. If not...well, start again. Make sure the water isn't too hot, as it will cook the yeast to death. After about 15 minutes, turn on your mixer, and start adding the other ingredients: Almond milk, sugar, salt, margarine, extract, and lastly the flour. Do not add this all at once. Allow the the dough to get thoroughly mixed before adding another cup. The end result dough should be slightly sticky. Shut off your mixer when it forms a dough ball, and cover the bowl with a damp kitchen towel. Let it rise for 1 hour. It helps if your kitchen is slightly warm, I always set mine on top of the oven while its on.
Preheat the oven to 375 degrees.
After an hour, it should have risen to almost 2x it's original size. Remove from the bowl, and lay out on a well-floured board or counter. Using a rolling pin, roll into a large, even, rectangle. It should be about 1/4" thick sheet.
I've always been a true believer of using as few bowls, pots, pans, utensils to make a dish as humanly possible, just because I hate doing dishes. So when I make the filling, this applies as well. Instead of mixing these ingredients in a bowl, I apply them right to the dough. Take a butter knife, and butter the entire slab of rolled out dough (thin & glaze-like, not Paula Dean style!). Sprinkle your raw sugar, brown sugar, and cinnamon in the same fashion. If you feel you are short on something, add a bit more! Be careful however, they get sweet fast. Nice additions are nuts, raisins, coconut or dried cranberries.
When all your filling ingredients have covered your dough, it's time to roll. From top to bottom long-ways, roll the dough into a log.
Once rolled into a log, use a sharp knife to cut into 1 1/2" slices and lay them flat on their sides in a well-oiled 9x13" casserole pan. Once they all have been cut and placed in the pan (you may have to reorganize them a bit to get them all to fit) cover them again with a damp kitchen towel and allow them to rise for another hour.
When risen, place in the oven for 20 minutes to bake.
To Glaze:
Add the orange zest to the Vegan Cream Cheese Frosting and mix well. Apply while the rolls are warm for best results.
Tips for making these easy:
Make the dough and allow it to rise overnight & create in the morning.
Create the rolls, cover the dish, and refrigerate and bake in the morning.
Happy Baking & Happy Easter!
<3thehappyinsomniac
Subscribe to:
Comments (Atom)